What to Expect During a Waterline Repair Service: An In-Depth Guide

Youmna Rehman

Waterline repairs can be a crucial home maintenance task, especially when a leak or break occurs. If your water bill has suddenly spiked or you've noticed water pooling in unexpected areas, it’s time to investigate your waterline. Knowing what to expect during a waterline repair service can help you prepare for the process, minimize disruption, and ensure you make informed decisions about your home’s plumbing needs.


Signs You May Need Waterline Repair

Before we dive into the repair process, it’s important to understand when a waterline repair might be necessary. Here are common signs that you may need to call a professional:


  • Sudden increase in your water bill
  • Low water pressure
  • Wet spots in your yard or basement
  • Unexplained puddles on your property
  • The sound of running water even when taps are off


If you notice any of these signs, it's important to schedule an inspection to determine the issue. A minor leak can turn into a significant problem if not addressed promptly.


Initial Inspection and Assessment

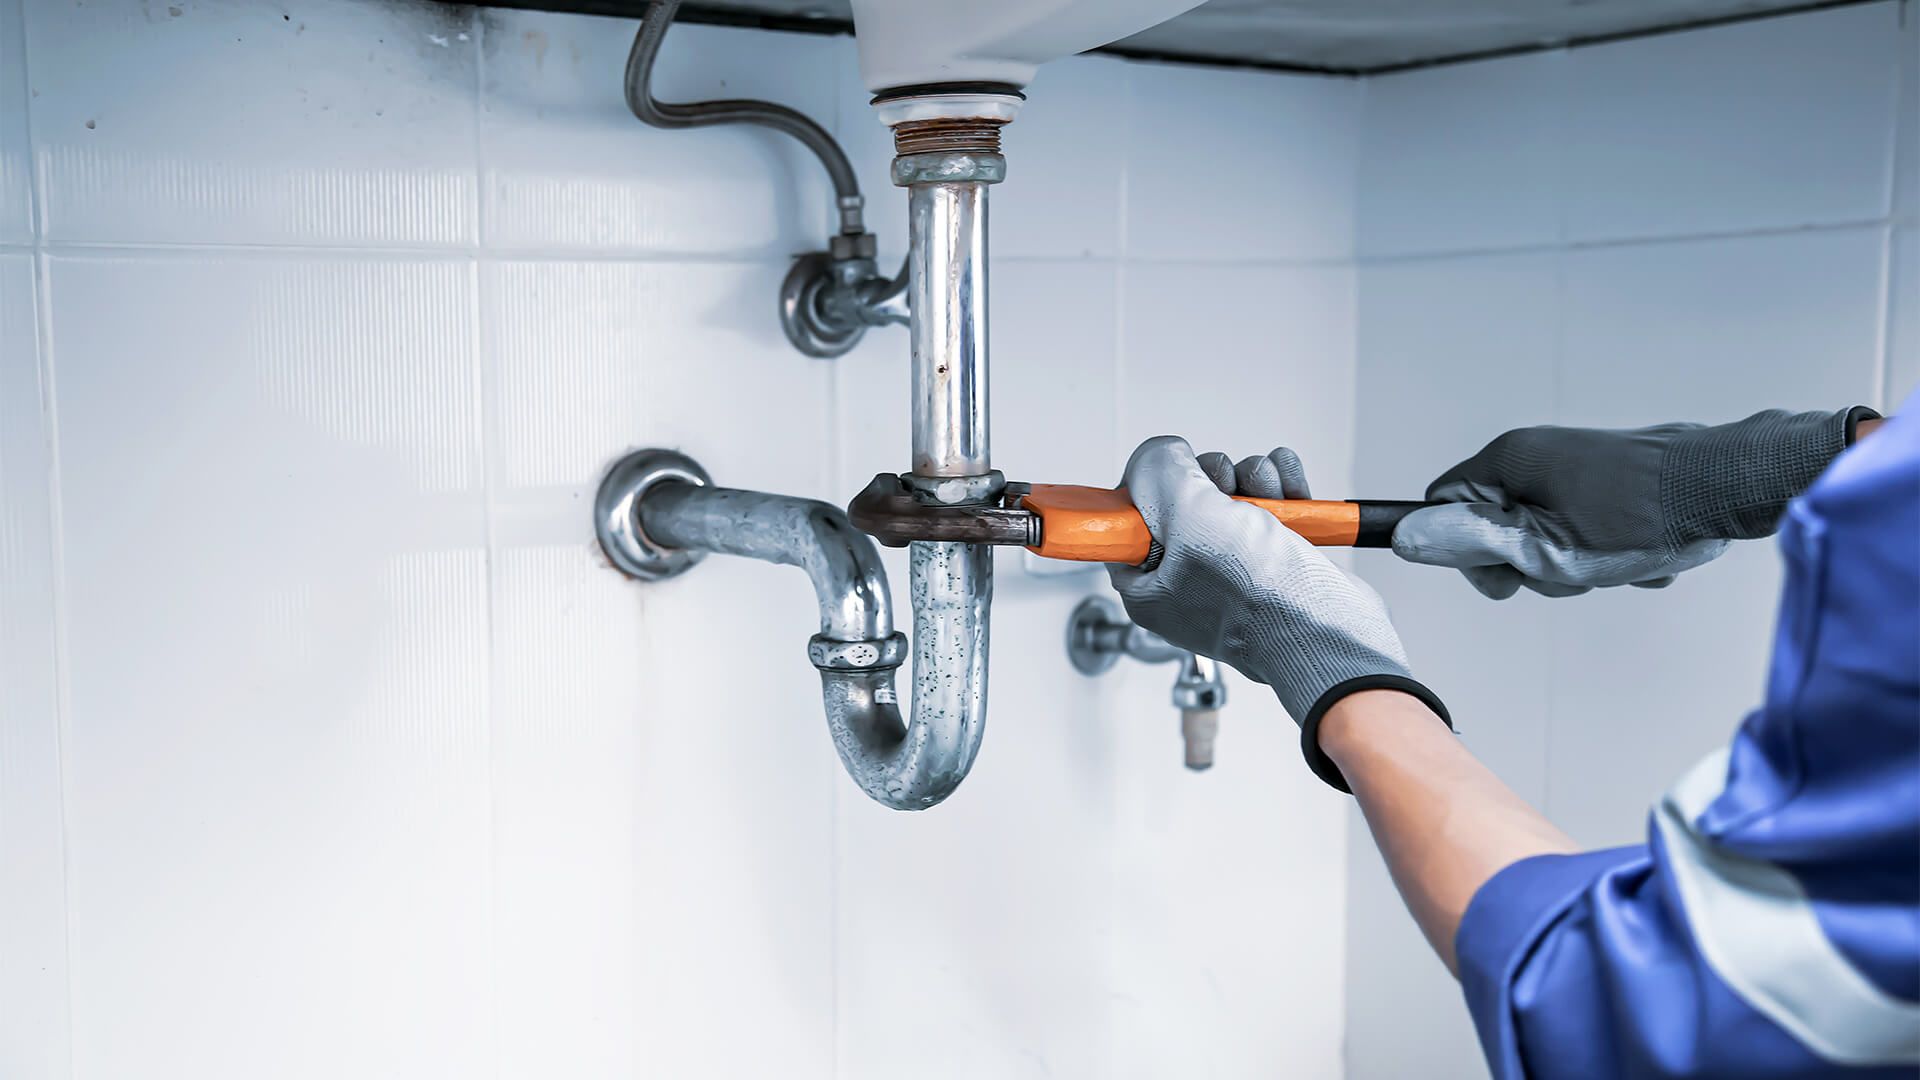
Once a plumber arrives, the first step in the repair process will be to inspect the waterline to determine the location and extent of the damage. This assessment can include:


  1. Visual inspection: The plumber will check for obvious signs of leaks, pooling water, or damage to exposed pipes.
  2. Pressure testing: A pressure test may be conducted to confirm that the issue lies within the waterline.
  3. Use of specialized tools: In some cases, plumbers may use acoustic devices or infrared cameras to detect leaks underground or within walls.


The plumber will then provide you with a detailed explanation of the issue and outline the necessary repairs.


Types of Waterline Repair Methods

The method used for your waterline repair depends on the extent of the damage and the location of the leak. Here are the most common waterline repair methods:


1. Traditional Dig-and-Replace Method

This is the most common method of waterline repair and involves digging up the damaged section of the pipe and replacing it. While effective, it can be disruptive since it requires excavation, which may disturb your yard or driveway.


Pros:

  • Effective for significant leaks or breaks
  • Can be used on any type of waterline material

Cons:

  • Time-consuming
  • Damaging to landscaping or paved surfaces


2. Trenchless Pipe Repair (Pipe Bursting or Relining)

Trenchless methods are less invasive and do not require extensive digging. Instead, plumbers create small access points and either pull a new pipe through the old one (pipe bursting) or insert a liner inside the damaged pipe (pipe relining).


Pros:

  • Minimally invasive
  • Preserves landscaping and driveways
  • Faster than traditional methods

Cons:

  • Slightly more expensive
  • May not be suitable for extremely old or severely damaged pipes


3. Spot Repairs

If the leak is minor and isolated to a specific section, the plumber may choose to repair only that portion. This could involve patching or replacing a small section of the pipe.


Pros:

  • Quick and cost-effective for minor leaks
  • Less invasive than full pipe replacement

Cons:

  • Only suitable for small, localized issues
  • May not address underlying issues in older pipes


What Happens During the Waterline Repair Process


Step 1: Shutting Off the Water

Before any work begins, the plumber will shut off the water supply to your home. This is necessary to prevent flooding and to safely work on the waterline. Depending on your home’s layout, this may mean shutting off water to the entire house.


Step 2: Excavation or Access Creation

In the case of traditional methods, excavation will take place to access the damaged pipe. For trenchless repairs, the plumber will create small access points to either side of the affected pipe.


Step 3: Pipe Repair or Replacement

Once the damaged area is accessed, the plumber will either repair or replace the pipe, depending on the extent of the damage. For trenchless repairs, a new pipe or lining will be inserted into the existing pipe, eliminating the need for full excavation.


Step 4: Testing and Restoration

After the repair or replacement is completed, the plumber will test the system to ensure there are no more leaks and that water pressure has been restored. If everything checks out, the final step is to restore any areas that were disturbed during the repair process, such as refilling trenches or patching access holes.


Potential Risks and Challenges

During a waterline repair, a few risks and challenges may arise, including:


  • Unanticipated damage: Excavation may reveal additional damage or issues, such as corroded pipes or tree roots, leading to extended repairs.
  • Temporary water shut-off: You may experience a lack of water for several hours or even a day during the repair.
  • Cost overruns: If unexpected complications arise, the cost of repairs may increase. It’s important to budget for potential surprises.


Preventing Future Waterline Issues

To avoid future waterline damage, consider the following preventive measures:


  1. Regular inspections: Schedule periodic inspections to catch potential problems early.
  2. Monitor water pressure: High water pressure can cause stress on your pipes, leading to leaks. Consider installing a pressure regulator.
  3. Tree root management: If you have trees near your waterline, keep an eye on their root growth to prevent pipe damage.
  4. Replace aging pipes: If your pipes are old, consider replacing them before a major issue arises.


FAQs About Waterline Repair

What causes waterline damage?

Waterline damage can be caused by a variety of factors, including tree roots, shifting soil, corrosion, freezing temperatures, and high water pressure.


How long does a waterline repair take?

The duration of the repair depends on the method used and the extent of the damage. Traditional dig-and-replace methods can take several days, while trenchless repairs may be completed within a few hours.


Is trenchless waterline repair more expensive?

Trenchless methods are typically more expensive upfront, but they may save you money in the long run by avoiding the costs associated with restoring landscaping or driveways.


How do I know if my waterline needs repair or replacement?

A professional plumber can assess the condition of your waterline and recommend the best course of action. Minor leaks may only require repair, while older or severely damaged pipes may need replacement.


Can I stay in my home during waterline repair?

Yes, but you may experience temporary water shut-offs. Most repairs can be completed without displacing homeowners.


Conclusion

Waterline repairs are a crucial part of maintaining your home’s plumbing system. Understanding the signs of damage, the repair methods available, and what to expect during the process will help you make informed decisions and minimize disruptions. Whether you opt for traditional or trenchless methods, addressing waterline issues promptly can save you from more extensive (and expensive) damage down the road.


Facts About Water Line Replacement That Everyone Should Know

How to Improve Your Home’s Water Pressure

by Youmna Rehman 18 April 2025
Hard water stains may seem like a cosmetic issue, but they’re more than just an aesthetic nuisance. If left untreated, they can etch into the surface of your glass, permanently dulling its clarity. But don’t worry—there’s hope. With the right knowledge and consistent care, you can banish these stains and restore your shower to its former gleaming glory.
by Youmna Rehman 18 April 2025
It’s one of those settings in your home you probably haven’t thought about—until your shower is either scalding hot or disappointingly lukewarm. The temperature on your water heater might seem like a minor detail, but it has a big impact on your comfort, your wallet, and even your health. So, what temperature should your water heater actually be set at? Spoiler alert: there isn’t a one-size-fits-all answer. The “right” temperature depends on your household needs, your risk tolerance for bacteria like Legionella, your energy-saving goals, and even the age of your plumbing system. Let’s break it all down in simple terms and help you find the sweet spot that keeps your showers steamy, your bills low, and your family safe.
by Youmna Rehman 18 April 2025
You’ve probably heard the term hard water tossed around, especially in home maintenance circles or plumbing advice forums. But unless you’ve directly dealt with the effects, it might just sound like another boring utility issue that can wait until later. Here’s the truth: hard water isn’t just a minor annoyance—it could be quietly wrecking your home from the inside out. From damaging your appliances and pipes to irritating your skin and costing you money, hard water is more than just a water quality problem—it’s a home health issue. And the worst part? Most people don’t even realize they have it until the damage is done.
by Youmna Rehman 17 April 2025
Toilets, too, are frequent culprits. A worn flapper or faulty fill valve can cause the toilet to run continuously, pushing your water consumption sky-high without you even noticing until the bill arrives. Many people don’t realize they have a toilet leak until they add food coloring to the tank and find color seeping into the bowl without a flush
by Youmna Rehman 17 April 2025
Repiping sounds like a big deal because it is. But ignoring it when your property truly needs it? That can lead to even bigger, costlier, and more destructive issues down the line. Think of your plumbing system like the veins of your property. If those pipes are corroding, leaking, or under pressure from age and wear, the entire system can begin to break down from the inside. And most of the time, it doesn’t happen all at once—it starts with subtle clues.
by Youmna Rehman 14 April 2025
Sinks are often the silent workhorses of our homes. From washing dishes and prepping food to brushing teeth and cleaning up messy hands, they’re in constant use—but rarely do they get the attention they truly deserve. Until something goes wrong. A slow drain, a musty smell, or a sudden leak can turn your day upside down. That’s why regular sink maintenance isn’t just a luxury—it’s a necessity. In this guide, we’ll explore why maintaining your sink is crucial, what causes problems, and how to keep things flowing smoothly for years to come
by Youmna Rehman 12 April 2025
Tankless water heaters and traditional (storage tank) water heaters. At first glance, they both do the same job. But a closer look reveals big differences in how they operate, how much they cost, and how well they meet your daily needs. Whether you're building a new home or replacing an old unit, making the right choice can affect your utility bills, home comfort, and maintenance needs for years to come. Let’s break down the features side by side—explaining how each type works and which one might be the better fit for you.
by Youmna Rehman 12 April 2025
A clogged or failing septic system is more than just an unpleasant mess; it can lead to thousands of dollars in repairs, nasty odors, health hazards, and environmental damage. The good news? With just a little attention and some proactive care, you can keep your septic tank in tip-top shape for decades. For professional services, reach out to us!
by Youmna Rehman 10 April 2025
rom clogged drains caused by pet hair to chewed pipes, scratched fixtures, or accidental flooding, pets can unknowingly wreak havoc beneath your floors and behind your walls. But don’t worry—this isn’t a reason to panic or banish your pets to the backyard. With a little planning, a few smart habits, and a basic understanding of where pets and pipes intersect, you can create a home that’s both pet-friendly and plumbing-safe.
by Youmna Rehman 8 April 2025
There’s nothing quite as unsettling as the sight of toilet water creeping up instead of swirling down. One second, you’re flushing like usual—and the next, your bathroom floor is under siege. If you've ever experienced a toilet overflow, you know it can feel like a full-blown emergency. But take a deep breath. Toilet overflows are common, and with the right approach, they’re entirely manageable. This guide will walk you through why overflows happen, what to do in the moment, how to clean up safely, and how to prevent future disasters. No plumber-speak. No panic. Just smart, practical advice. For professional help , reach out to us! How to Unblock a Sink in 5 Ways with Household Items Why Do Toilets Overflow? The Real Reasons Behind the Rising Water Before you can fix the problem, it helps to understand what caused it in the first place. Most toilet overflows come down to one of three things: 1. A Clog in the Trap or Drain The most frequent cause is a clog in the toilet's trap—the curved section of pipe inside the bowl—or farther down in the drain. This is usually due to excessive toilet paper, non-flushable items (like wipes, sanitary products, or even small toys), or buildup over time. 2. A Full or Backed-Up Sewer Line If your toilet overflows even when it hasn’t been flushed, the issue might lie deeper in your plumbing system. A blocked main drain line can affect multiple fixtures in your house, and that’s a sign of a serious underlying issue—like tree roots invading your pipes or years of buildup finally causing a backup. 3. Malfunctioning Toilet Parts Sometimes, the problem lies in the tank itself. A stuck flapper or a faulty float valve can cause water to continuously fill the bowl beyond safe levels, creating the perfect storm for an overflow—especially if there's already a partial clog.  Step 1: Stop the Water Flow Immediately The first thing to do when you see water rising is to stop it from going any further. You need to act quickly to avoid flooding your floor. How to Cut the Water Supply Fast Open the tank lid and press down on the flapper (the rubber disk at the bottom of the tank) to stop water from continuing to enter the bowl. At the same time, locate the shut-off valve —usually behind or next to the base of your toilet—and turn it clockwise to stop water flow entirely. If the valve is stuck or you can’t reach it, lift the float ball or cup inside the tank to stop the refill process temporarily. You’ve just bought yourself time to deal with the issue without more water spilling out. Step 2: Clean Up the Overflow (Without Spreading Germs) Once the water has stopped rising, it’s time to handle the mess—safely and thoroughly. Start With Containment Use old towels or a mop to soak up the water from the floor. If the overflow was clean water (like from a flush without waste), it’s a lot easier to manage. But if the overflow includes waste, treat the situation like a biohazard. Wear gloves, use a disinfectant, and dispose of everything you used to clean up properly. Disinfect Everything It Touched Toilet water—even clean-looking water—can carry bacteria. Use a bleach-based cleaner or disinfectant on every surface that got wet, including baseboards, walls, and any rugs or items on the floor. Open windows or turn on an exhaust fan to help things dry quickly and prevent mold. Step 3: Unclog the Toilet Like a Pro Now that the overflow is under control, it’s time to tackle the root cause: the clog. Use the Right Plunger Not all plungers are equal. For toilets, you’ll need a flange plunger , which has an extended lip designed to seal over the curved toilet opening. Insert it firmly into the bowl and push and pull with force—while maintaining the seal. It might take several tries, but most clogs will break up with this method. Bring in the Toilet Auger If plunging doesn’t work, try a toilet auger —a flexible, crank-style tool that can reach deep into the drain to break apart or remove the clog. It’s easy to use and very effective for stubborn blockages. Still stuck after trying both tools? That’s your sign to call in a professional plumber. Tips for Conserving Water at Home Hidden Risks: Why You Should Take Overflows Seriously Toilet overflows might seem like a minor inconvenience, but they can lead to much bigger problems if left untreated. Water Damage and Mold If water seeps under your tile, linoleum, or wooden flooring, it can rot the subfloor and weaken your home’s foundation over time. Damp conditions are also perfect for mold and mildew, which can lead to respiratory issues and structural damage. Health Hazards When waste or contaminated water is involved, the health risks increase. Harmful bacteria and viruses can survive on surfaces and in porous materials. That’s why thorough cleaning isn’t optional—it’s essential. Expert Recommendations: What Plumbers Want You to Know Plumbers deal with toilet overflows every day, and they often say the same thing: “Watch what you flush.” The Golden Rule: If It’s Not Toilet Paper, Don’t Flush It Even products labeled “flushable” can cause clogs. Wipes, cotton swabs, paper towels, and feminine hygiene items don’t break down like toilet paper does and can accumulate in your pipes over time. Schedule Regular Plumbing Inspections If your toilet overflows often or drains slowly, get your plumbing system inspected. A professional can spot pipe damage, root intrusions, or blockages before they cause a crisis. Prevention Is Key: How to Stop Overflows Before They Start Once you've dealt with a toilet overflow, you’ll never want to repeat the experience. The good news is—preventing it is mostly about good habits. Make Toilet Rules in Your Household Teach everyone, especially children, what not to flush. Keep trash cans nearby so people aren’t tempted to toss tissues or other items into the bowl. Check and Maintain Toilet Parts Periodically open the tank and make sure the float, flapper, and fill valve are in good condition. If your toilet runs frequently or the bowl water level seems too high, make adjustments or replace the worn parts. Have Tools Handy Keep a flange plunger and a toilet auger in or near your bathroom. In an emergency, being prepared makes all the difference. Conclusion: You’re in Control, Even When Things Overflow Toilet overflows may be messy, inconvenient, and a little gross—but they don’t have to ruin your day. With calm action, a bit of know-how, and the right tools, you can take control of the situation and prevent it from getting worse. The best part? Every overflow is a learning experience that makes you better prepared for the future. So if it ever happens again (and let’s hope it doesn’t), you’ll know exactly what to do: stop the water, clean smart, unclog like a boss, and take steps to make sure your toilet stays trouble-free.
More posts